
The Art of the LS Swap: What Every C10 Owner Should Know
A clean LS swap blends skill, patience, and precision — and rewards you with decades of reliable performance.
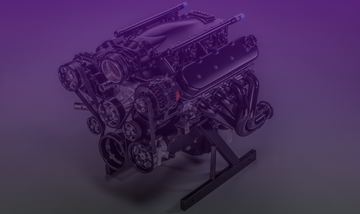
Swapping an LS motor into your C10 is more than a weekend project — it’s a blend of skill, patience, and precision. From engine mounts and oil pans to fuel lines, wiring, and tuning, every small detail plays a huge role in the final performance. A proper LS swap not only increases horsepower and reliability but also future-proofs your classic for decades. This guide walks through critical components, common pitfalls, and why choosing quality parts from trusted suppliers like Don Dotta Solutions makes the difference between a smooth build and a frustrating one.
“Great LS swaps aren’t complicated — they’re consistent. Plan the system, not just the engine.”
Plan the Swap Like a System
Treat your C10 like a platform, not just a shell for a new engine. Build a parts roadmap that includes the engine, transmission, fueling, cooling, electrical, exhaust, and brakes. Decisions in one system affect the others — a radiator choice influences hose routing and steam ports; transmission choice dictates crossmember position and driveshaft length.
Start your list in Engine & Drivetrain, then round out with Fuel & Cooling and Electrical & Wiring.
Fitment Fundamentals: Mounts, Pans, and Crossmembers
Proper engine position is everything. Use a swap-specific mount kit designed for your C10 generation (1960–66, 1967–72, 1973–87) to set height and setback correctly. Most builds need a rear-sump or swap oil pan to clear the crossmember and steering. Verify header clearance early so you don’t chase interference later.
Essentials live under Engine & Drivetrain.
Fueling for EFI: Pressure, Return, and Filtration
The LS wants ~58 psi with steady volume. Build a reliable, return-style system with an EFI-ready tank (in-tank pump preferred), regulator/filter combo, and quality AN lines and fittings. Secure lines away from heat and moving parts, and route a proper return to keep temps and vapor lock in check.
Shop fuel system solutions in Fuel & Cooling and hardware in Fasteners & Bolts.
Cooling Strategy: Radiator, Fans, and Steam Ports
A modern aluminum radiator with a shroud and dual electric fans keeps temps in the safe zone. Use LS-specific upper/lower hoses and don’t skip the steam port connection to the radiator or reservoir — it purges trapped air from the heads. Consider a high-flow thermostat and a clean ground path for fan relays.
Cooling components live in Fuel & Cooling.
Electrical & ECU: Harness, Sensors, and Grounds
A quality standalone harness simplifies the entire swap. Choose the correct MAF/MAP layout for your engine, verify connector types (EV1 vs EV6 injectors), and ensure proper fuse/relay integration. Grounds are non-negotiable: engine-to-frame, body-to-battery, and ECU ground all need clean metal. Plan OBD-II access for tuning and diagnostics.
Explore Electrical & Wiring for harnesses, fuse panels, sensors, and more.
Exhaust & Headers: Clearance and Serviceability
Swap-fit headers or manifolds that clear your frame and steering box make life easier. Stainless shorties suit street builds; long-tubes for track powerbands. Use quality gaskets and fasteners, add V-band connections for painless service, and keep O2 sensors in proper distance for accurate fuel trims.
Transmission Choices: Gearing and Driveability
Overdrive automatics like the 4L60E/4L80E or a T56 manual transform highway manners. Match flexplate/flywheel, converter/clutch, and crossmember to your chosen trans. Verify output yoke and measure for driveshaft length. Final-drive gearing (3.42–3.73 for many street builds) balances acceleration and cruise RPM.
Find transmission-support parts under Engine & Drivetrain.
Suspension, Steering, and Brakes: Controlling the Power
Power without control is a liability. Upgrade tubular control arms, coilovers or drop spindles for stance and geometry. On the stopping side, run a matched booster/master with a proportioning valve and healthy rotors/pads. Refresh steering joints and rag joints for precision.
Browse Suspension & Steering and Brakes.
“If it rattles now, it fails later. Use the right fasteners, torque specs, and heat management from day one.”
Tuning & First Fire: Do It Methodically
Prime the oil system, verify fuel pressure, and check for leaks before the first start. Use a wideband O2 to monitor AFR and a conservative spark map for break-in. Calibrate fans-on temps and idle control for your cam profile. Good tuning is drivability: hot restarts, cold starts, and steady cruise are your benchmarks.
Common Pitfalls (and How to Avoid Them)
- Skipping the steam port: Causes hot spots and headaches — always plumb it.
- Poor grounds: Random misfires/sensor chaos — clean, short ground paths fix it.
- Wrong pan or mounts: Crossmember and header interference — choose C10-specific parts.
- Undersized cooling: Heat soak in traffic — shroud + dual fans + correct hoses.
- Cheap fittings and clamps: Fuel odors and leaks — step up to proper EFI hardware.
- No overdrive: Miserable highway manners — consider an OD trans for real street use.
Budgeting Smart: Buy Once, Cry Once
The cheapest path rarely survives the first summer. Prioritize parts that are hard to replace once installed — mounts, oil pan, wiring harness, radiator/fans, headers. Saving a few dollars on critical components can cost weekends later. Buy from suppliers who stock complementary hardware so your system works as designed.
Build It Right with Don Dotta Solutions
Tap the curated parts that seasoned C10 builders trust: